VLC Media Player is arguably the best media player available and it's totally free and open-source. In addition to playing damn-near any video file you can imagine, this wonderful little guy also has a built-in streaming client/server. That may not mean much to you, but we're going to use these capabilities to rip almost any DVD and convert it into a small, usable file all in a single (albeit complicated) step.
First off, you can get VLC here. Windows users can also get this "portable" version, which is nice because you don't have to muck around with any installers. This tutorial was made using Mac OS X, but VLC is available for nearly any operating system under the sun so these directions will work for you no matter which one you're using.
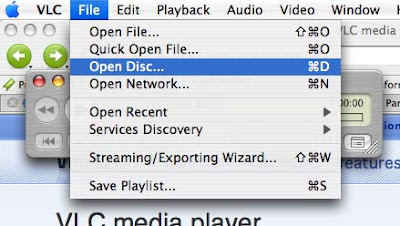
Once you've installed and/or opened the program, select "Open Disc..." from the 'File' pull-down menu:
You should get a dialog box that looks something like this:
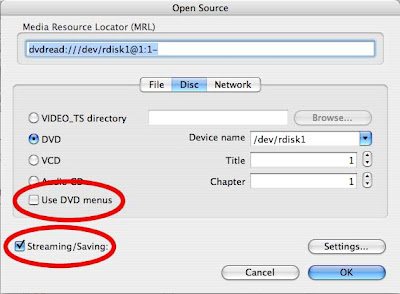
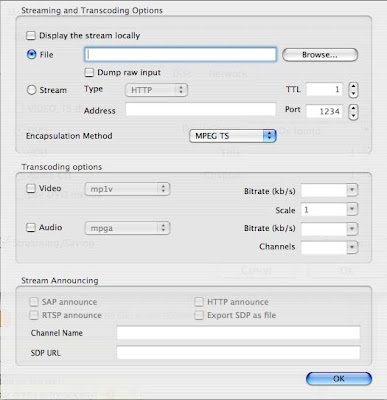
Make sure the DVD bubble is selected and the box next to 'Use DVD Menu' is unchecked. Next, check the box labeled 'Streaming/Saving:' and click on the 'Settings' bubble, which will open a new dialog box that looks something like this:
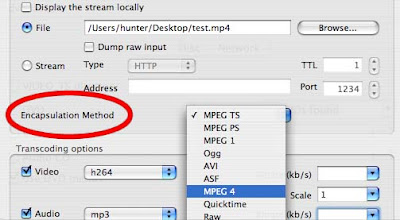
Make sure the 'File' bubble is selected. Then, from the pull-down menu beside 'Encapsulation Method,' select MPEG 4, which is an advanced and efficient container format:
Next, click on the 'Browse' button near the top, then name the file and place it wherever you like; the extension should automatically be set to .mp4. After that, click the 'Save' bubble:

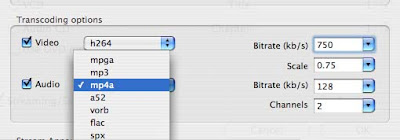
Now, under 'Transcoding options, check the box labeled 'Video' and select 'h264' from the pull-down menu to the right. Do the same thing for 'Audio' but choose 'mp4a' from the list. I would also recommend, in the boxes labeled 'Bitrate', you enter 750 in the one for video and 128 in the one for audio, as well as change the 'Scale' to 0.75 and the 'Channels' to 2 (these will ensure that your resulting file isn't awkwardly large):
If your computer is fast enough, you can also check the box to 'Display the stream locally,' which will allow you to watch the movie as it rips. However, my computer, a G4 PowerBook, is not fast enough and it ruined the rip when I tried it.
Click 'OK' to return to the previous dialog box, and click 'OK' again to finish. Your video should now be ripping into the file you made for it earlier. When it's finished, your rip should be of pretty good quality with a size of approximately 450 to 650 MB, depending on the length of the movie.
Longer movies will obviously create larger files, although you can play with the 'Bitrate' settings to find a compromise between quality and size that best suits your needs.
First off, you can get VLC here. Windows users can also get this "portable" version, which is nice because you don't have to muck around with any installers. This tutorial was made using Mac OS X, but VLC is available for nearly any operating system under the sun so these directions will work for you no matter which one you're using.
Once you've installed and/or opened the program, select "Open Disc..." from the 'File' pull-down menu:

You should get a dialog box that looks something like this:

Make sure the DVD bubble is selected and the box next to 'Use DVD Menu' is unchecked. Next, check the box labeled 'Streaming/Saving:' and click on the 'Settings' bubble, which will open a new dialog box that looks something like this:

Make sure the 'File' bubble is selected. Then, from the pull-down menu beside 'Encapsulation Method,' select MPEG 4, which is an advanced and efficient container format:

Next, click on the 'Browse' button near the top, then name the file and place it wherever you like; the extension should automatically be set to .mp4. After that, click the 'Save' bubble:

Now, under 'Transcoding options, check the box labeled 'Video' and select 'h264' from the pull-down menu to the right. Do the same thing for 'Audio' but choose 'mp4a' from the list. I would also recommend, in the boxes labeled 'Bitrate', you enter 750 in the one for video and 128 in the one for audio, as well as change the 'Scale' to 0.75 and the 'Channels' to 2 (these will ensure that your resulting file isn't awkwardly large):

If your computer is fast enough, you can also check the box to 'Display the stream locally,' which will allow you to watch the movie as it rips. However, my computer, a G4 PowerBook, is not fast enough and it ruined the rip when I tried it.
Click 'OK' to return to the previous dialog box, and click 'OK' again to finish. Your video should now be ripping into the file you made for it earlier. When it's finished, your rip should be of pretty good quality with a size of approximately 450 to 650 MB, depending on the length of the movie.
Longer movies will obviously create larger files, although you can play with the 'Bitrate' settings to find a compromise between quality and size that best suits your needs.
Copyright notice: using this method to rip commercial DVDs, even if you own them, may be prohibited in your country. It is best to research the laws in your locale before following these steps.

