السبت، 28 مايو 2011

Programs Won't Launch in Win7 64-bit

So, I've been running into an issue on my Lenovo Thinkpad X120e when booted into Windows 7 where programs won't launch from the taskbar when I click on them. The little transparent box shows up around it, it sits for a second, then fades away.

I found, however, that I could run things from the command line, though that was not a good fix. After futzing around with the startup applications in msconfig, I found that it would start programs just fine if I turned off all of my startup items. This was also suboptimal, so I set to tracking down the culprit from the startup items by enabling them one-by-one and restarting each time.

UPDATE (6/5/11): Turns out my below "fix" may have just been coincidental, because my issue returned. It hung around through several reboots until I ran Windows Update and updated my video card driver, after which it went away again. Whether this fixes things permanently, we'll have to see.

I'll update this post if anything changes.

Original, ineffectual post:
Eventually, I found the problem to be related to the Sidebar application, which powers the CPU frequency and weather widgets I like to have sitting on my desktop. :(

I haven't had any problems since I turned it off.

الاثنين، 16 مايو 2011

Profiled, optimized libsnes builds for win32

I've been playing around with mingw, doing cross-compiles of libsnes with profile-guided optimizations (PGO) for use with SSNES in Windows and I think I've gotten it down pretty well.

I used the following C-flags at compile time:
-msse2 -fmerge-all-constants -fmodulo-sched -fgcse-sm -fgcse-las -funsafe-loop-optimizations -fsched-spec-load -fsched-spec-load-dangerous -fsched-stalled-insns=0 -fsched-stalled-insns-dep -fsched2-use-superblocks -fipa-pta -ftree-loop-linear -ftree-loop-im -ftree-loop-ivcanon -fivopts -fvariable-expansion-in-unroller -ffast-math -fbranch-target-load-optimize -maccumulate-outgoing-args -combine
This means it's only going to work on CPUs that support the SSE2 SIMD instructions, but that includes pretty much every processor manufactured in the past 8 years, so I figured that was good enough.

If you want to give them a try, you can get them from my mediafire.

الأحد، 15 مايو 2011

More Emulator Pixel Shaders (CRT updated and more)

I'm just going to dive right in with the pictures in this post. If you want/need some backstory, read my previous CRT shader post. These shaders are all available in Screwtape's bsnes git repo, except for Beam4, which can be downloaded here, and NTSC, which can be downloaded here (both mirrored in my mediafire in case the pastebins expire before Screwtape adds them to his repo).

UPDATE (5/30/11): Added shots of caligari's phosphor21x shader (a.k.a. caligari's scanlines in Screwtape's repo). UPDATE (6/3/11): Added Themaister's Dot 'n' Bloom, available from Screwtape's repo. UPDATE (6/18/11): Added caligari's scanlines - rgb triad.

All images are taken at 3x scale, followed by that same image blown up 400% with no further interpolation. As always, click the thumbnails to embiggen.

4xBR

This one uses an algorithm similar to HQ4x and it shows.

Beam4

This is a multipass scanline shader from cgwg that also simulates an electron beam that takes longer to rise than to fall. It is perfect for producing the pseudo-hires transparency used in Kirby's Dreamland 3 and Jurassic Park. Sadly, it only works in emulators that support shader spec 1.1 (at the time of this writing, Themaister's SSNES and PS3 homebrew emus written by Dante Ali).

Bicubic

This one's pretty straightforward, using an algorithm similar to that of bilinear filtering (aka, 'smooth video'). It's a little sharper and preserves edges a little better.

CRT.OpenGL

This is the latest and greatest version of the collaborative CRT shader. The screen curvature is user-definable, based on changing a single value in the helpfully commented shader code. As you can see, it looks totally amazing. It also runs a lot faster than it used to, so give it a shot even if your machine couldn't handle it before.

CRT-simple.OpenGL

This one is very closely related to the aforementioned CRT shader, only this one is optimized for weaker cards while only sacrificing a tiny bit of accuracy. If your machine can't run the full-fledged CRT shader, this one is your last good chance.

Dot 'n' Bloom

Another cool one from Themaister, Dot 'n' Bloom treats each pixel like a single, distinct dot and then adjusts its size based on brightness, such that brighter dots appear larger than darker ones, similar to a CRT electron beam (though this shader is not attempting to reproduce a CRT, it resembles one). He then added a bit of bloom to blend things together some. The results look really nice in motion (especially on Super Metroid :D) and the shader runs extremely fast.

Lanczos 4-tap

Another fairly straightforward interpolation filter, this one runs quite fast even on weaker hardware. You can learn more about the Lanczos algorithm and its use in resampling at the Wikipedia.

Lanczos 6-tap

As you might have guessed, this one is very similar to the 4-tap Lanczos, but it is further sharpened, which leads to the ringing/halo effect around sprites.

NTSC

This multipass shader is the result of cgwg and Themaister porting blargg's awesome NTSC filter to GLSL. It looks quite nice and doesn't bog down the CPU like the regular filter version. Unfortunately, it only works on shader spec 1.1-compatible emus.

Phosphor21x
This is caligari's implementation of an algorithm originally written by xythen in Matlab, which served as the inspiration for the work that later became CRT.OpenGL. This shader builds on xythen's work to be essentially scale factor-independent, except it looks a little weird at 2x in my experience; everything larger looks great. An interesting note: the scanlines that appear with this shader are not simply added in. Instead, they are naturally occurring as a result of the phosphor simulation. Pretty cool stuff :D

By uncommenting some lines in caligari's code, you can enable one of three phosphor/shadow mask arrangements, of which the RGB triad option is the nicest (I recommend clicking these thumbnails to see in full size):

As you can see, this option causes some serious dimming of the picture brightness, which was also a technological obstacle for actual CRT engineers when shadow masks were first being designed and implemented. In bsnes, you should be able to just increase the gamma in the picture settings to compensate. You can download this shader variation from my mediafire account.

Quilez

This fast, crisp interpolation filter is totally new to the emulation scene. It's based on some fancy math demonstrated by Inigo Quilez and represents a good compromise between the pixelate2x and bicubic shaders.

Simple TV Blur


This one's rather subtle, but is intended to do the minimum amount of work required to reproduce the pseudo-hires transparency.

Beam4+NTSC

Just for fun, I used SSNES' shader stacking support to combine the new NTSC shader with the Beam4 shader. It's almost indistinguishable from Beam4 alone (except for some really slight changes to the color palette), so I wouldn't bother trying it yourself.

CRT+NTSC

As above, I tried stacking the NTSC shader with the new CRT shader and this was the result. It's kinda cool in a way, like newsprint. :P According to cgwg, this is happening because it's only picking up the first pass of the NTSC shader, which has no color values.

CRT-Flat+Caligari's Scanlines - RGB Triad
When the regular CRT shader (edited to have 0.0 for the distortion value) is paired with caligari's scanlines - RGB triad variant, you end up with a pretty neat result:

The colors are off by a good bit (I think because of the double gamma correction) and it's very dark, but the phosphor triads from caligari's are still clearly discernible over the CRT shader's already-awesome result. Still not perfect, obviously, but getting close in a lot of ways.

الخميس، 14 أبريل 2011

Barkeeper's Friend for Cleaning Stainless Steel Cookware

I don't normally do this sort of post on my blog, but I figured people might find it useful, so...

Barkeeper's Friend is an abrasive cleaning powder, similar to Comet, that is renowned for its ability to clean stainless steel pots and pans. I've always heard that it can clean stains you would think were there forever, so I figured I'd give it a shot with my well-worn tea kettle:
As you can see, there are some pretty nasty black stains flecked around the bottom of the kettle, quite a bit of brown crud caked on underneath that, and an overall cloudiness to the finish everywhere else.

By reading the directions on the side of the Barkeeper's Friend label, you can see that it recommends a couple of different ways to use the product:

1. wet the item to be cleaned so the powder will stick to it better, sprinkle on some Barkeeper's Friend, then scrub vigorously with a damp rag

2. mix Barkeeper's Friend with water to make a paste and then spread that onto the surface of the item to be cleaned and let it sit for a minute or so, then scrub vigorously with a damp rag.

I tried both methods.

The first method is faster, obviously, but I found its performance underwhelming. While cloudiness was greatly reduced after scrubbing, much of the brown crud remained and the black stains were completely unaffected. Unfortunately, I wasn't able to take a picture after this treatment. You'll have to just take my word for it.

The second method is kind of a hassle, but it's worth the extra time and effort. In addition to clearing up the cloudiness, this method also removed the vast majority of the brown crud and helped somewhat with the black stains, though a noticeable amount of black staining still remains after scrubbing.

Here's how it looked after cleaning:
Substantially improved, but far from perfect.

I also scrubbed the scorched bottom surface of the kettle using both methods and left a section cleaned only with regular soapy water as a control:
Again, method 1 certainly helped, but method 2 was much more effective. However, even method 2 wasn't able to completely clean up everything.

If you have any questions, drop me a comment.

الخميس، 24 مارس 2011

Configuring Lenovo TrackPoint Mouse Wheel Emulation Scrolling in Ubuntu

I have a Lenovo X120e and have grown accustomed to using the once-loathed TrackPoint (also known as the nubbin, the navigation nipple, the eraserhead, and others) for scrolling through Web pages, windows, etc. as I would with a mousewheel. Here is how you would do it in Ubuntu (in this case 11.04 Natty Narwhal, but it should apply to anything Maverick or later:


Open up a terminal and type:
gpointing-device-settings
UPDATE (8/13/11): The package isn't installed by default in 11.10 Oneiric Ocelot, so you'll have to install it first, either through Synaptic package manager or by typing
sudo apt-get install gpointing-device-settings
Select the TrackPoint device from the pane on the left. Mine is called "TPPS/2 IBM TrackPoint." In the middle of the window, you'll see a checkbox labeled "Use wheel emulation." Check the box, along with the ones labeled "Enable vertical scroll" and "Enable horizontal scroll" as you see fit.
You'll also need to select your scroll button from the pull-down menu. In my case, it was button 2, but YMMV.


While you're here, you can also switch to the TrackPad options and disable your trackpad, if that's what you're into.

الأربعاء، 23 مارس 2011

Ubuntu Natty on Lenovo ThinkPad X120e

If you've read my earlier post regarding Maverick on this machine, you'll know I ran into a few annoying issues.

The biggest problem was that my Broadcom wireless driver kept getting deactivated with every reboot, so I decided to try installing Natty instead.

The first issue I ran into with Natty was that the installer kept crapping out before the partitioning phase with an error about ubi-partman failing to start due to error 141. There are a couple of Launchpad bugs filed for this error, but a claimed fix that was checked in a few days earlier did not seem to help things. What fixed me up, though, was using the alternate install image, which uses an ncurses-based installer rather than the fancy Ubiquity installer.

So, moving on, everything installed fine and, upon booting into the new system, the hardware driver manager detected my wireless card and recommended the proprietary Broadcom SLA driver. Click to enable, reboot and wireless should be fine and dandy.

If you opted for the default Ralink card, it should be detected and supported out-of-the-box, without even needing to consult the driver manager.

By default, the system utilizes the open source "radeon" driver, with 3D support provided by the Gallium3D backend. This should be fine for light 3D duties, such as Compiz, though it does have a show-stopping bug that will cause crashes, loops and reboots under heavy stress, such as 3D games. As long as you don't play any games, though, you should be fine. If you want to play games and/or use video decoding acceleration, you'll have to install the proprietary Catalyst driver, but it is not yet compatible with the X Server included in Natty. This will be resolved before final release in April.


At this point, my system works pretty well, except for an odd dependency hell issue that is preventing Unity from installing/running because of some Compiz virtual package conflict B.S., though I suspect this will be sorted out in a couple of days. UPDATE (3/23/11): fixed now.

I haven't tried suspend/hibernate yet, but will update with results as soon as possible.
UPDATE (3/23/11): waking from suspend seems fine, though my notification stuff isn't updating (wireless is showing that it's disconnected, even though it's not, etc). Hibernate, in contrast, seems totally b0rked. It just sits there blowing its fan and blinking the sleep LED on the front edge until you do a hard poweroff. :(

UPDATE (4/1/11): To get multitouch working on your trackpad, install the package gsynaptics (not to be confused with the synaptic package manager):
sudo aptitude install gsynaptics
and then type:
gpointing-device-settings
You should be able to enable two-finger scrolling from the trackpad menu. While you're there, you can configure the navigation nub for mousewheel emulation, if that's what you're into.

Everything else I've tested, including audio and webcam, work just fine. Even the function volume keys work.

Things I haven't tested:
HDMI-out
audio over HDMI
VGA-out

The middle scroll button works too, it just takes a little configuration.

الجمعة، 18 مارس 2011

My First Mid-horns for Hifi

I've spent a lot of time on audiophile forums reading about the advantages of horns over purely cone-based speakers, including crisp sound reproduction, consistency, "realism" and extremely high sensitivity. The drawbacks, of course, being high cost (sometimes ridiculously so), a dearth of non-vintage models to choose from, few places to demo products before buying and, perhaps most importantly, the tremendous size requirements for horns that will reach lower frequencies. Horns are also known for their "honkiness" and directivity, which can be a problem if you often listen to music outside of your stereo's "sweet spot."

While any driver can be horn-loaded, when people talk about horns, they usually mean a compression driver with a horn attached to the front, either through bolting (the standard for audiophile equipment) or via a threaded, screw-on junction (the standard for professional equipment). Relative to normal drivers, compression drivers have very low distortion due to the small size of the membrane and the relatively short distance the membrane needs to travel.

So, as I began looking into mid-horns, most of the information available online suggests that you will need to purchase vintage equipment, such as 1950s-era JBL compression drivers and similarly aged JBL or Altec Lansing horns or else build your own horns, which can be a daunting task to say the least. If you go on eBay and look for these products, you'll see that very little is available for less than $1,000, as they have reached the status of collectors' items and are priced as such.

However, I also noticed that horns and compression drivers are still used quite extensively in professional audio settings, such as stage monitors and PA speakers. In fact, Selenium's D250-X compression driver has performance specs that looked very similar to those of the multi-thousand-dollar, vintage compression drivers I was seeing on eBay, including an uncrossed frequency response from 400 Hz to approximately 9 kHz and a sensitivity of 107 db at 1w/1m, but with a power handling capability of 150w (vs. very low power handling on vintage equipment). The biggest difference, though, is the price: ~$35!

These MCM drivers are also a good, cheap option, with a low frequency range down to 100 Hz!

Likewise, when looking into mid-horns, the prices for newly constructed or high-quality vintage equipment usually range from ~$750+ up to tens of thousands of dollars. This is simply too expensive for me, so I began looking for other options, including DIY solutions and professional audio. At this point, I had to make some decisions, including which horn curve I wanted to use.

Deciding on horn curves is basically a matter of weighing a series of compromises and figuring out what matters to you most/least. While conical horns tend to have the least honky horn coloring and are also easy to construct, owing to their straight-angled sides, they are also the least space-friendly and also tend to be very ugly, in my opinion. Exponential horns take up considerably less space than conical horns for a given frequency response, but they are more difficult to construct, due to their curved sides. Similarly, square/rectangular horns tend to have better dispersion and listening angles than round horns, while round horns impart less distortion to the sound wave.

I decided that a round exponential, while difficult to construct, would be my best bet, since I want to experience the horn sound and my space is limited (my listening room is less than 200 sq feet).

While weighing my options, I came across some potentially good options in the pro realm, including the Dayton Audio H12RW 12" waveguide and the Selenium HL14-25 exponential horn. The waveguide was attractive to me because it can easily drop right into an existing speaker cabinet designed to house a 12" woofer. However, waveguides are a little different from traditional horns, and that's really what I wanted to try. That in mind, I went with the HL14-25 horns, which have a suggested frequency range from approximately 600 Hz to 5 kHz, well inside the range of the driver.

When I received the horns, I first tested them by wiring them in series with my Phase Technology Teatro 7.5s (8 ohm, 90 db sensitivity, freq. resp. of 40 Hz to 20 kHz), but the sensitivity of the horns was too far off from that of the Teatros, such that the horns were ear-splittingly loud by the time the volume was high enough to hear the Teatros comfortably. With that in mind, I resurrected my old Sony solid state receiver (100w per channel) and wired it to push the Teatros and my subwoofer while my Dared VP-20 pushed the Selenium horns. This way, I could independently adjust the volumes to achieve a good balance between the horns and the Teatros, and then use my preamp's volume control as a sort of 'master volume.'

To run my initial tests, I left the horns uncrossed and expected a good bit of distortion below the 400 Hz mark, since that's as low as the drivers are supposed to go. I cautiously kept the volume very low as I didn't wish to blow my new drivers on their first go 'round. However, I was pleasantly surprised to find that the horns handled the lower frequencies quite gracefully, with no distortion that I could notice--even when playing as loud as I could comfortably stand--and with a fairly smooth (though rapid) rolloff below around 600 Hz. I'm assuming this success is largely due to the fact that the horns are probably receiving only a handful of watts instead of the 100+ watts that are normally shoved through them in professional applications.

Based on this experience, I have decided not to bother with a crossover at this time, though I may revisit the issue in the future.

I guess the real question now is: "How does it sound?" In short, it sounds fantastic. The frequency range covered by the horns encompasses guitar solos, most vocals and organs, which all sounded a bit anemic on my Teatros alone. The clarity and definition in these frequencies is truly astounding and must be experienced. If you've only ever heard cone drivers for this range (like me before I bought these horns), it's honestly impossible to imagine how rich the sound reproduction can truly be.

My setup is designed to allow for extensive A/B testing (in addition to the independent volume control for the Teatros and horns, the VP-20 has independent volume control for each channel), and this is where the improvements really shine. Even my wife (who is very honest about differences she can and can't hear, often to my chagrin) was blown away by the disparity between Teatro+horn vs. Teatro alone.

The horns admittedly have some strong directivity, but they also have a good--though different--sound off-axis, such that listening outside of the sweet spot is still nice, just not the same as getting right there in the middle.

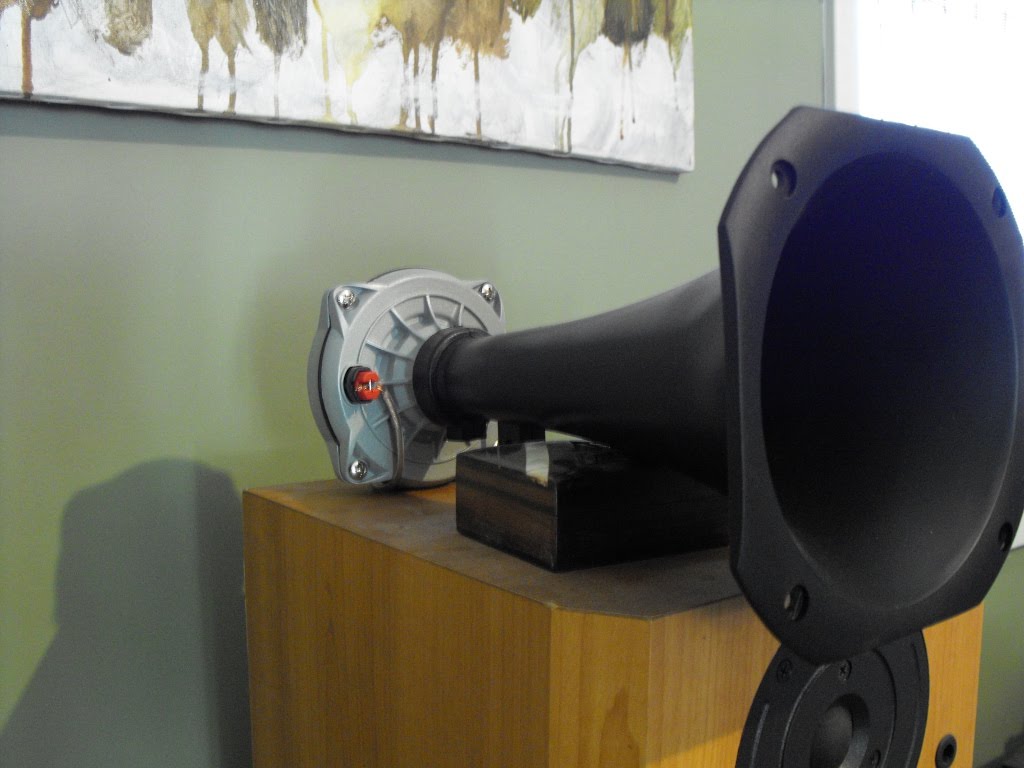
Here are a couple of pictures of the horns sitting on top of my Teatros:

In the first picture, you can see the VP-20 that pushes them, as well a little bit of my disc changer, preamp and crummy solid state amplifier.