الجمعة، 24 أكتوبر 2008

Intrepid Ibex broke my Netatalk

I mostly use Macs, but all of my media files are stored on a home server that runs Ubuntu. I had been using Gutsy and sharing my files using netatalk, an open source implementation of Apple's AppleTalk protocol, and everything was working swimmingly.

However, as soon as the beta for the newest version of Ubuntu--known as Intrepid Ibex--was released, I upgraded to it and was shocked to find that I could no longer connect through netatalk using my Macs (they're running 10.5 Leopard). Every time I tried, it would fail with this error:
A volume failed to mount.
The volume [directory name] could not be mounted
I fiddled with configurations on both ends to no avail, so I decided to try a workaround: I uninstalled the version of netatalk from the Intrepid repos (sudo aptitude remove netatalk) and then downloaded outdated deb binaries for netatalk and its only other major dependency, libdb4.2, from the Gutsy repos.

Install (sudo dpkg -i [package name]) libdb4.2 first (it'll give you a warning about downgrading from a higher version), then netatalk, and then let the service start. You should now be able to connect to your shares again.

Leave me a comment if this doesn't fix your problem and I might be able to help.

الاثنين، 29 سبتمبر 2008

How To Compile HandBrake With New Psy Options Enabled

Update: It looks like the new x264 version is committed to the SVN repo now, so you should be able to just perform Steps 1, 2, and 5 (i.e., a normal SVN checkout and compile) to get the new psychovisual options.

Update (5/15/09): I have working binaries available in my PPA repository. Directions for adding it to your package manager are available here.

Here are directions to download and install the latest development code for HandBrake that can take advantage of the revolutionary new psychovisual additions to the x264 codec (known as psychovisual rate distortion [psy-rd] and psychovisual trellis [psy-trellis]).

Step 1: check out the latest source code from SVN:
svn co svn://svn.handbrake.fr/HandBrake/trunk HandBrake
Step 2: navigate to the new directory
cd HandBrake/contrib
Step 3: edit the download location for the x264 codec in your favorite text editor (I prefer nano):
nano version_x264.txt
then, either delete or comment out (put a # in front of it) the address that is already there and replace it with this:
http://download.m0k.org/handbrake/contrib/x264-r979-6d4af8d.tar.gz
Step 4: return to the HandBrake directory:
cd ..
If you just want to use the CLI version (Linux users have no choice), you're almost finished and can go straight to Step 5. If you are using OS X or Windows, though, you can update the GUI interfaces to reflect these new options by applying the appropriate patch (for OS X or for Windows)

To apply the patch, move it into the HandBrake directory and type into a terminal:
patch -p0

Step 5: compile as usual:
make
That should get you all set. The new options require a subme value of ≥6, which should be the new default (and should be reflected in the GUIs and presets). If you have any questions or concerns, leave me a comment and I'll try to help.

الجمعة، 19 سبتمبر 2008

HandBrake With New Adv. x264 psy-rd

Update: I just finished conducting some tests using live, film-grained content and the details are posted below the cartoon data.

x264 just committed some fancy new features, known as psychovisual rate distortion and psychovisual trellis, to their git repository. These features are supposed to produce a subjectively superior picture by maintaining detail and minimizing blurriness during the encoding process (I guess; read more about it here, at the blog of Dark Shikari, a developer for the x264 codec).

However, if you read the posts at the Doom9 forums linked in his blog post, they mention that Peak Signal To Noise Ratio (PSNR)--basically the only objective measure of picture distortion available to me--will always be negatively affected by the new features, and freeze-frames will also look worse. This makes the new features sound a little like voodoo to me, since I tend to favor objective measures over subjective ones. Regardless, I decided to try it out.

I used a bitrate of 250 in an mp4 container with these adv. x264 settings:
ref=5:mixed-refs:bframes=6:bime:weightb:b-rdo:me=umh:subme=7:
filter=0,-1:trellis=2:threads=2
For the psy encoding, I followed those settings with these psy-specific options (first number sets the psychovisual rate distortion [value from 0.1-1] while the second controls the psychovisual trellis [again, 0.1-1]):
psy-rd=1,1
If I understood things correctly, psy-rd only works with a subme setting ≥6, btw, so keep that in mind if you want to use the psy settings. Here are a couple of screenshots from an episode of Futurama encoded using otherwise identical settings (v0.9.2 on the left [no psy], svn 1734m [psy-enabled] on the right):

As you can see, it's a pretty noticeable difference favoring the psy shot, especially in a few key areas. Of note, you can see significantly less blocking on the dark spots on the cloud in the psy shot, and the top platform against the red sky is much sharper.

Now for the numbers:

As expected, Avg. PSNR fell from 42.602 to 41.557 in the psy encode, and Global PSNR fell from 40.655 to 39.641.

Dark Shikari and the Doom9 guys said that encoding speeds would be relatively unchanged, and mine fell only slightly from approx. 20 fps to approximately 18 fps. However, despite using the exact same bitrate option, my filesize increased from 56.6MB to 58.1MB, a difference which may partially explain the picture improvements.

Apparently, the psy options really shine in retaining small details, which are necessarily absent from cartoon sources, so I intend to do another comparison soon using some live-action sources, including at least one with visible film grain.

Stay tuned.

Another potential concern to keep in mind is that, as usual, QuickTime can have trouble with these new options, especially using the Perian codec pack. It can make strange graphical glitches and generally look like shit. Stick to VLC if possible.

Update: I conducted similar tests to those performed on the cartoon source using the Kubrick classic, Dr. Strangelove. This source has some serious film grainage thanks to its age, so we can really see what psy-rd is all about.

I've taken my clips and dropped them into an animated gif, so click on the picture to see the comparison:

The first thing that really jumped out at me is that the psy version is much darker overall, with a much higher contrast ratio (i.e., the blacks are blacker, whites whiter, and the picture looks less gray). It's arguable whether the detail is better in these still-shots with psy-rd added, but it looks much sharper in motion.
Now the difference between the 2 encodings really comes out. Again, the psy-enabled shot is darker overall, with a higher contrast ratio, and the film grain is highly evident. In contrast, the non-psy shot looks as though a smoothing filter has been run over it, steamrolling the details.
Here, just as in the previous comparison, the differences are stark and easily noticeable. Hell, you can almost read the letter through the backside of the page!

Now for the numbers:
As in the earlier experience, avg. PSNR fell from 43.616 in the non-psy encoding to 42.602, while global PSNR fell from 43.371 to 42.347. Again, frames per second remained relatively stable between the 2 encodes.

Conclusions:
After the somewhat underwhelming cartoon-based comparison, I was undecided as to whether I would upgrade to the psy-enabled version, but this comparison has definitely sold me on it. In certain cases that have a lot of small, fine details (such as with Dr. Strangelove), the psychovisual analyses can create a 250 kbps video that rivals an 800-1000 kbps xvid encoding. This means smaller file sizes and faster streaming, which is always a good thing.

Let me know if you have any questions or comments.

For directions on compiling your own binary with the psy options enabled, visit my post here.

الثلاثاء، 2 سبتمبر 2008

How to Compile HandBrake GTK GUI from SVN

UPDATE (3/4/09): These directions no longer work on code checked out from the SVN. I've left them here for future reference (and for folks attempting to build the stable 0.9.3 code), but updated build instructions are available here.

Update (5/15/09): I have working binaries available in my PPA repository. Directions for adding it to your package manager are available here.

This information has been gleaned from my and others' posts on the ubuntu forums. I have reproduced it here for ease of access and to avoid having to read all 14+ (at the time of this writing) pages of that thread. This process requires at least a standard Intrepid Ibex (8.10) Ubuntu installation, but it can certainly be adapted for other distros (users of OpenSuSE will need to download the additional dependencies zypper and in to build the CLI, as well as gtkhml2 and gtkhtml2-devel to build the GUI). If you just want precompiled binaries, see my post here.

Update (11/9/08): there's a new dependency added as of the last couple of days: libgtkhtml3.14-dev. I added it to the list, but be sure you install it if you've suddenly run into problems. Update (11/24/08): 2 more dependencies--libgstreamer0.10-dev and libgstreamerplugins-base0.10-dev. Update (2/2/09): another dependency--libdbus-glib-1-dev

Step 1: download the dependencies (in a terminal, type):
sudo aptitude install libgtk2.0-dev libglib2.0-dev libhal-storage1 libhal-storage-dev libhal-dev automake build-essential jam libtool subversion zlib1g-dev libbz2-dev lib64bz2-1.0 libbz2-1.0 xmlto texinfo subversion gfortran doxygen libsdl1.2-dev gfortran-multilib gcc-multilib g++-multilib libesd0-dev libgtk1.2-dev libfftw3-dev electric-fence linux-kernel-devel libgtkhtml3.14-dev libgstreamer0.10-dev libgstreamer-plugins-base0.10-dev yasm intltool libdbus-glib-1-dev
Step 2: install libdvdcss2 from the medibuntu repository (all on one line):
sudo wget http://www.medibuntu.org/sources.list.d/hardy.list -O /etc/apt/sources.list.d/medibuntu.list
then type (again, all on one line):
wget -q http://packages.medibuntu.org/medibuntu-key.gpg -O- | sudo apt-key add - && sudo apt-get update
and finally:
sudo aptitude install libdvdcss2
Step 3: check out the latest HandBrake code from the project's SVN repository:
svn co svn://svn.handbrake.fr/HandBrake/trunk HandBrake
Step 4: navigate to the newly created HandBrake directory:
cd HandBrake
Step 5: compile the HandBrakeCLI binary:
make
Step 6: navigate to the gtk directory:
cd gtk
Step 7: prepare the source to compile the GUI against the newly built CLI binary:
./autogen.sh
Step 8: compile and install the GUI:
make && sudo make install
This should add all the relevant menu shortcuts and so forth on a standard Ubuntu install. Leave me a comment if you have any questions/problems and I'll try to help.

32-bit HandBrake GTK GUI and Yasm deb Binary for Ubuntu

Update (5/15/09): I have working binaries of the latest code available in my PPA repository. Directions for adding it to your package manager are available here.

Download HandBrake GTK GUI (GHB) 32-bit deb
Download HandBrake GTK GUI (GHB) 64-bit deb
Download Yasm 0.7.1 32-bit deb
(they're compressed into a tarball, but the debs are inside)

Update: These binaries include a new version of the x264 codec that no longer requires as many options to do the same thing. From Dark Shikari (a main x264 developer):
x264 is removing b-rdo and bime options this week. GUI makers, take note, and prepare patches. bime will be enabled at subme >=5 automatically. New subme options will be organized as follows:
subme6: RD on I/P frames
subme7: RD on all frames
subme8: RD refinement on I/P frames
subme9: RD refinement on all frames

new subme 6 = old subme 6
new subme 7 = old subme 6 + b-rdo
new subme 8 = old subme 7 + b-rdo
new subme 9 = didn't exist, RD refinement in B-frames is completely new.

RD refinement in B-frames consists of qpel-RD as in P-frames, and also RD-bime for bidir blocks. Overall the speed cost for this option should be less than old subme6->7 (new subme7->8).

This is a first step on the road to decreasing the number of unnecessary options in x264.
I finally got my 32-bit Hardy Heron build environment set up, so first thing I did was crank out a couple of debs for the yasm assembler and HandBrake's official GTK GUI (known as GHB) from SVN.

Yasm is version 0.7.1 and GHB is version svn 1911.

Leave me a comment if these do/don't work.

الاثنين، 1 سبتمبر 2008

How to Hack Mario Kart Wii Online for Unlimited Items Including Blue Shells

Update: looks like it's easier to cheat nowadays. If you install the homebrew channel, you can enable cheats from there. I don't know the specifics, so feel free to leave a comment if you know any more than that.

Update (6/19/09): from reader Rosalina, you can indeed hack it from the homebrew channel:
Materials:
A Homebrew Channel on your Nintendo Wii
An SD Card
Ocarina in your SD Card
Legend of the Twilight Princess for Wii

Use Legend of the Twilight Princess game to get Homebrew Channel and then
Go to File and then open TXT file. Then select rmce01 is Mario Kart Wii's ID. Then go to add a code/comment. Type in as many as you want but make sure you call it what it is called in the Mario Kart Wii Instructions Manual. And make sure you put “Infinite” before the power you want (the most fun powers are Star, Mega Mushroom, Triple Red Turtle Shells, Triple Green Turtle Shells, Bullet Bil l(the rocket) and some time Triple Banana, Fake Item Box and Bomb-omb.) OK? Now type the codes in the code box {codes are at www.usbgecko.com/codes}. Insert the SD Card into the PC and then go to 'Export to GCT' and select your SD Card. Insert the SD Card into your Wii and go to the Homebrew Channel and press start. You will be able to hack Mario Kart on the Homebrew Channel. My guess to stop hacking Mario Kart is to take your SD Card out of your Wii.
This information is out of date, but I'll leave it here for posterity:
I did some digging and this guy who goes by the handle /dexter0 (aka ihack@you) appears responsible for this nonsense (46 pageviews when I accessed it), but I could be wrong. It appears this hack is accomplished using a USB Gecko attachment, which is pretty much like an Action Replay or a GameShark.

He basically just edits the database values that represent your item box status to choose what item you have at any point (resulting in unlimited items).

From /dexter0 (aka ihack@you):

These codes were hacked under NTSC-USA. And since they involve assembly hacking, they are not easily ported. So don't ask for PAL or JP codes.

[Write Char Offset]
D27E4DDC 00000002
3FE08000 93BF1500
3BE00000 00000000

[Always Have Item *Works anywhere] - Add Your Own Button Activator
48000000 809BEE20
DE000000 80008180
58010000 00000014
DE000000 80008180
48100000 80001500
DE000000 80008180
1400008C 000000XX
14000090 0000000Y
E0000000 80008000

...you need both of them for it to work. The Write Char Offset must come first! And don't click the apply button while a race is active, you'll crash them game.
Have fun. Try not to be a dick.

If you wish to report a cheater, drop a comment on my Wall of Shame page with their name and a description of their Mii (if available).

الاثنين، 25 أغسطس 2008

How to Enable Surround Sound in Ubuntu Linux

Update (04/21/10): The information in this original post is no longer applicable since Ubuntu switched to the PulseAudio sound infrastructure. I'm leaving it all here for reference, but here's how to do it now:

Step 1: open up a terminal (Applications > Accessories > Terminal or Alt+F2 and type 'gnome-terminal' into the command applet)

Step 2: at the command prompt, type alsamixer

Your prompt should change to something like this:

Step 3: Scroll all the way to the right (using the arrow keys) until you reach a section labeled "Channel." It will most likely say "2ch" over it. Press the 'up' arrow key until it says 6ch (for 5.1 surround) or 8ch (for 7.1 surround).

Exit the alsamixer program by pressing ctrl+C. You should be all set. You may have to go into your Sound Preferences and change either the 'Profile' setting on the 'Hardware' tab or fiddle with the devices in the 'Output' tab. I didn't have to do this, but you might.

If you have any problems, leave me a note in the comments and I'll try to help.

Update (10/08/08): I was using Gutsy when I wrote this post, but I have since upgraded to Intrepid Ibex (8.10) and it still works for me. YMMV

I've been hard at work lately trying to get my motherboard's (an Asus M2V-MX SE socket AM2) 6-channel surround sound working with Linux and it's been a surprisingly stubborn pain in my ass. However, I finally succeeded this past weekend and decided to document my process here for others to hopefully benefit from.

The first complication I ran into when trying to get surround sound working is that my mobo does not have the normal multichannel output jacks. That is, instead of having the blue, orange, and black plugs that are in most multichannel setups, it instead just has what appears to be standard blue, pink, and green jacks that are usually used for stereo output, mic-input, and line-in, respectively.

What is poorly documented, though, is that the pink and green jacks can double as the orange and black plugs when enabled by software. It's a stupid way of doing things, IMHO, but low-end mobo manufacturers apparently do it to save costs.

Anyway, in Windows, enabling this hidden functionality was accomplished using the Realtek Sound Manager program that was installed with my sound driver. However, as with damn-near all driver utilities, it does not have a Linux equivalent.

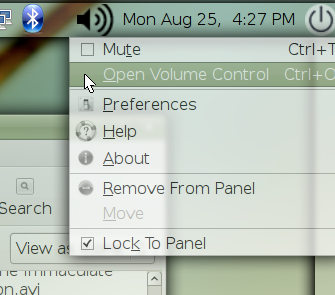
Instead, open the Alsa-mixer GUI by double-clicking on the speaker icon in the upper-right of the screen (a.k.a., the Volume Control applet):

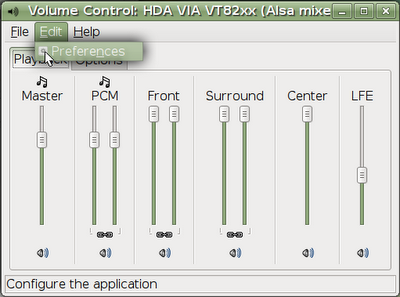
Then select 'Preferences' from the 'Edit' pull-down menu:

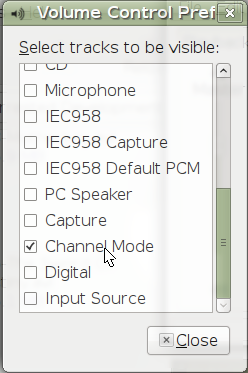
From here, you'll want to scroll down a bit and check the 'Channel Mode' box, and you'll probably want to check the 'Surround,' 'Front,' 'LFE,' and 'Center' boxes as well:

When you go back to the main applet, click on the 'Options' tab, which should now have an option to choose the number of channels:

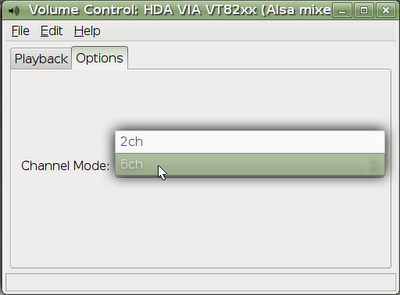
Select '6ch' for a 5.1 setup or '8ch' in a 7.1 setup. This should unlock the hidden functionality of those pink and green jacks. On my system, the pink jack converts to the orange function and the green converts to the black function, but YMMV.

You could stop here, but I suggest doing one more step to make sure everything is configured properly. Open up a terminal and type:
speaker-test -Dplug:surround51 -c6 -twav
This will make a creepy disembodied voice play through each channel in succession so you can be sure your speakers are plugged into the right jacks.

Btw, this command is for a 5.1 / 6-channel surround card. A 7.1 system will use this command instead:
speaker-test -Dplug:surround71 -c8 -twav
For some people (like me), the system automatically duplicates the front channels' sound to the back channels for listening to stereo sources, such as mp3s, normal non-DVD video files, etc. Other people, however, will need to do a bit more to make this happen. If you're one of these people, open up a terminal and type:
gedit ~/.asoundrc
Whether this file is blank or already has some stuff in it, just skip down to the bottom and copypasta this in (courtesy of the Gentoo wiki):
pcm.!dmix {
type dmix
ipc_key 1024
slave {
pcm "hw:0,0"
channels 6
period_size 512
buffer_size 1024
}
}
pcm.!default {
type plug
slave.pcm "dmix"
slave.channels 6
route_policy duplicate
}
You may have to change "hw:0,0" to something else, depending on your sound card's location. When you restart, surround signals will still work like before, but stereo signals should be duplicated. If, on the other hand, you have no sound or your sound is weird, just reopen the ~/.asoundrc file and delete the part you added (or try one of the other configurations from the aforementioned Gentoo wiki). No big deal.

Let me know in the comments if this works for you or not or if you have any questions.