الأربعاء، 30 يناير 2008

Using the cat Command To Hide Files Inside Other Files

cat is a standard command from Unix operating systems, such as BSD and Mac OS X, and Unix-like operating systems, such as Linux, that can be used to concatenate and display files. In this tutorial, I'm going to teach you how to hide any file inside any other file using cat, such that no one will every know the hidden file is there. This obviously has a number of uses, including providing another layer of protection for sensitive information such as bank numbers, personal information, etc.

WARNING: this is an advanced trick that requires the use of the command line. If you are scared of using the command line, don't bother continuing.


Ok, now that that's out of the way, pick a file you want to hide and another file you want to hide it in and place both files on your desktop. In my case, I'm going to hide an archive
inside a picture

Next, open a terminal. For Mac users, go to Applications => Utilities => Terminal.app; for Linux users, you'll have to find out where your particular distro puts it. Switch to your desktop:
cd Desktop

Now, we're going to perform the cat command:
cat archive.rar >> 1.jpg

Now my archive file is concatenated to the end of the picture file. If I double-click on the picture file, it will open in my picture-viewing program without any indication that it is abnormal in any way. However, as you can see from these before/after pics:

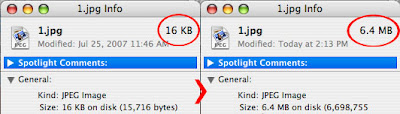
the picture's file size is now much larger, thanks to it having the archive attached. Anytime you want to access your hidden file, just rename your file to the hidden file's extension and open as normal:


Note: If you plan on hiding anything really important in a file using this method, I also suggest using some sort of encryption, in case someone actually finds it. This obfuscation just adds another layer of protection for your information.

الاثنين، 21 يناير 2008

How To Backup Your DVDs using DVDShrink

The most common question people ask me is how to backup commercial DVDs (which usually come in DVD-9 format) for burning to regular, run-of-the-mill blank DVDs (DVD-5 format). There are many ways to accomplish this, but one of the easiest is to use DVDShrink. It's a closed-source program that's available for Windows users, although Linux users (such as myself) can run it effectively through WINE.

Step 1

The first step is to download DVDShrink. It's pretty easy to find and you can download it here or here. After that, double-click the installer; the default options should be fine for most users.

Step 2

After you've installed DVDShrink, open the program. You should get a window that looks something like this:


Next, click the "Open Disc" button at the top and select your DVD drive from the menu (usually the D: drive in a standard Windows environment):


DVDShrink will now begin analyzing your DVD. This usually takes around 2 minutes. You can uncheck the box labeled "Enable video preview" if you are worried about spoilers:


Step 3

When it's finished analyzing, you should end up with the DVD structure in the left panel and some compression options in the panel on the right, like this:


Next just click on the "Backup!" button at the top:


You should get a menu like this:


From the "Select backup target" pull-down menu, select "Create ISO image file" and then click the "OK" button:


This will make an exact copy of your DVD, shrunken down to fit a single-layer DVD. There are many other options you can fiddle with in DVDShrink, such as removing sound from menus or reducing the quality of unimportant features to improve the quality of the main movie, but they're not really *necessary* so I'm not going to cover them here.

When DVDShrink finishes encoding, you should have an image file (ends in .iso) that will fit on a standard 4.7GB single-layer DVD. To burn it, you need to use an external program with image-burning capabilities, such as Nero or Alcohol 120%. I personally use the shareware demo version of a program called DVDSanta available free from various places, including here.

If you get this error:

then your DVD uses an unusual copy-protection mechanism that DVDShrink cannot bypass. If this happens, you'll have to rip the DVD using another program first, such as DVD Decrypter, and then use DVDShrink to resize it (Note: this error may also appear when running the program through WINE. Thus, Linux users are encouraged to use DVD Decrypter first).

Copyright notice: using this method to rip commercial DVDs, even if you own them, may be prohibited in your country. It is best to research the laws in your locale before following these steps.

الثلاثاء، 23 أكتوبر 2007

How to Rip and Convert DVDs Using VLC Media Player

VLC Media Player is arguably the best media player available and it's totally free and open-source. In addition to playing damn-near any video file you can imagine, this wonderful little guy also has a built-in streaming client/server. That may not mean much to you, but we're going to use these capabilities to rip almost any DVD and convert it into a small, usable file all in a single (albeit complicated) step.

First off, you can get VLC here. Windows users can also get this "portable" version, which is nice because you don't have to muck around with any installers. This tutorial was made using Mac OS X, but VLC is available for nearly any operating system under the sun so these directions will work for you no matter which one you're using.

Once you've installed and/or opened the program, select "Open Disc..." from the 'File' pull-down menu:


You should get a dialog box that looks something like this:


Make sure the DVD bubble is selected and the box next to 'Use DVD Menu' is unchecked. Next, check the box labeled 'Streaming/Saving:' and click on the 'Settings' bubble, which will open a new dialog box that looks something like this:


Make sure the 'File' bubble is selected. Then, from the pull-down menu beside 'Encapsulation Method,' select MPEG 4, which is an advanced and efficient container format:


Next, click on the 'Browse' button near the top, then name the file and place it wherever you like; the extension should automatically be set to .mp4. After that, click the 'Save' bubble:


Now, under 'Transcoding options, check the box labeled 'Video' and select 'h264' from the pull-down menu to the right. Do the same thing for 'Audio' but choose 'mp4a' from the list. I would also recommend, in the boxes labeled 'Bitrate', you enter 750 in the one for video and 128 in the one for audio, as well as change the 'Scale' to 0.75 and the 'Channels' to 2 (these will ensure that your resulting file isn't awkwardly large):


If your computer is fast enough, you can also check the box to 'Display the stream locally,' which will allow you to watch the movie as it rips. However, my computer, a G4 PowerBook, is not fast enough and it ruined the rip when I tried it.

Click 'OK' to return to the previous dialog box, and click 'OK' again to finish. Your video should now be ripping into the file you made for it earlier. When it's finished, your rip should be of pretty good quality with a size of approximately 450 to 650 MB, depending on the length of the movie.

Longer movies will obviously create larger files, although you can play with the 'Bitrate' settings to find a compromise between quality and size that best suits your needs.

Copyright notice: using this method to rip commercial DVDs, even if you own them, may be prohibited in your country. It is best to research the laws in your locale before following these steps.

الاثنين، 22 أكتوبر 2007

How to Find, Play and Download Free Music Online Using Songbird

Update: While this tutorial certainly still works, Songbird has gone through some substantial changes since this was written and much of it can be accomplished more easily by using the search function at skreemr.com (which is available immediately in Songbird now, btw).

This is a variation on an old trick using the new open-source media player, Songbird. There are tons of places to find guides on using Google search-modifier strings to find exactly what you want, be it songs, programs, pictures, videos, etc. We're going to use that well-worn method, only by utilizing Songbird, we can preview the songs before downloading and manage the songs directly in a full-featured media player.

Step 1: Getting Started

You can get Songbird here. It's currently under heavy development, but is quite stable and chock full of features. When you install the program, it will give you the option of also installing a few recommended add-ons, such as an iTunes library importer and ipod support. You can decide on your own if you would like these additions.

Step 2: Finding Music

Type Google's address (www.google.com) into Songbird's address bar. You should get a familiar screen:


Now, type this whole messy search string into Google's search bar (I'll explain some of what it's doing in just a sec) [Note: those little vertical lines are 'pipes'; they're made by hitting shift+backslash]:
intitle:index.of + (ogg|mp3|flac|aac|wma) + "band or song name" -htm -html -php -asp -inurl:e-mp3s.eu -inurl:www.freemp3hits.net
The first part of the string will confine the results to indexes of files, while the second part will tell it what kinds of files to look for. You'll want to replace 'band name' with the name of the band you are looking for (I used Mozart, since his music is in the public domain and therefore does not violate copyright laws). The last two entries, the ones that start with '-inurl:' will cut out results from some unscrupulous companies that have tried to capitalize on this song-finding method.

Now just make a bookmark of the results page so you can come back and use this search string with different band names whenever you like:


If you follow any of the search hits, you should come to a page that looks something like this:


You'll notice that Songbird automatically finds all of the media on the page and sorts it down at the bottom of the screen where you can play it like a local file. If you want to download any of it, just click on the download button to the right of the song name.

السبت، 20 أكتوبر 2007

The Easy Way to Download Commercial-free TV shows with BitTorrent using Miro

The Easy Way to Download Commercial-free TV shows with BitTorrent using Miro

1. Getting Started
The best way to download TV shows online is to use BitTorrent. However, it can be a pretty complicated process, requiring you to search various torrent trackers for the torrent files and then fiddle with often-complicated torrent clients. Instead of all that, I'm going to show you how to do it all through a single free, open-source program called Miro (download it here).

One of the great things about Miro is that it is multiplatform, meaning that these directions will work for you whether you're on Windows, Mac OS X, or Linux.

Once you've finished downloading/installing Miro, open the program. In addition to the numerous (and generally shitty) shows you can already get for Miro from the built-in channels on the "Miro Guide," you can also search/download videos from various video-streaming sites like YouTube and DailyMotion (in the "Video Search" channel) or make your own channels using RSS feeds, which is what we're focused on right now.

2. Finding Shows
To find your shows, turn your browser to the community-driven TV tracking site, tvRSS. At the top of the page, follow the link that says "Shows."


Now, find a show you would like to download and click on the link. Next, click on the link labeled "Search-based RSS Feed."


This will take you to another page that (depending on your web browser's capabilities) looks like either a list of episodes, or a bunch of computer-crap-nonsense, as pictured below.


Either way, just copy the address from your web browser's address bar and move on to step 3.


3. Setting up a custom channel
Go back into Miro and, from the "Channels" pull-down menu, select "Add Channel."


Paste the address from step 2 into the window and hit "OK."


Now, right-click (or ctrl-click for mac-users) on the channel you just made and select "Rename Channel" to name it whatever you want.


Now you're done. Miro should already be downloading the most recent show from your channel. If it's not, or if you would like to download something else, just select the channel and click the little blue arrow in the bottom-right-hand corner of what you wish to download.

When it's finished, the show will appear in the "Library" section, ready to watch. You can repeat this exact process for each show you want to follow.

Another great thing about Miro is that it will play nearly any video file you throw at it, so you can do it all, from downloading to watching, with just one excellent, free program.